

Here we go to the next steps in the TAU Army Project.
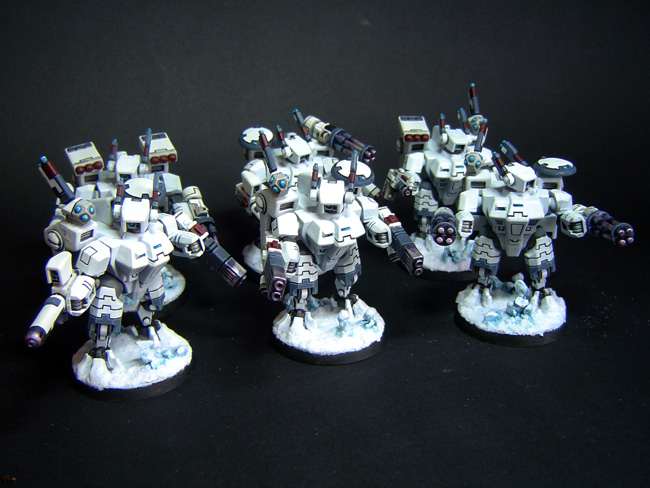
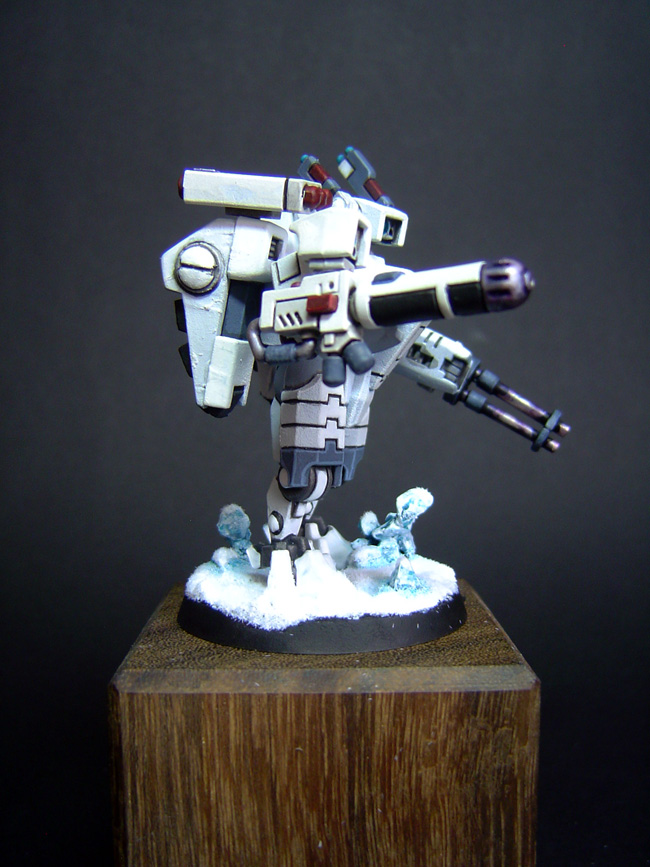
Last week I painted 6 Crisis Battlesuits with all weapon options for those and 6 Ghost Battlesuits.
So lets start with the Crisis battlesuits. The customer added in forefield several magnets on the suit itself on all points weapons and upgrades can be assembled. Also all Equipmet itself and all weapons which are allowed to ad to a crisis battlesuit had had magnets and so, as a player, you can choose whatever eqipment and upgrades you want to play and add them just with a silent "click" when the magnets get put together. Its a very cool thing as you can change whatever you want whenever you want from Game to Game.
So i painted the Crisis Battlesuits mainly with the Airbrush. After they have been promered in a light grey, i sprayed the whole Miniature with Fenrisian Grey followed by a layer of Ghostly Grey sprayed in an Angle of 30° from above all around the Miniature which gave the first blending from dark to lighter. After that i sprayed several Layers of White in the same Angle till the high edges were clean white and so i got a blending from Fenrisian Grey up to White. After that i turned the Miniatures upside down and sprayed again a smooth layer of fenrisian Grey from feet to head direction.
The effect is as follows. I have dark parts on all deeper parts and from above a more and more clear White ( on the pics you see what i mean )
After that i took my mixed black glaze that i specially mixed from Nuln Oil Shade and Lahmia Medium to thin it in 2:1. With that i chooses some parts on the Suit and "greyed" them in a lil dirty style also on several parts of the weapons which were painted seperately.
So then i started with the Bluegrey suit parts and then the eyecatch color red.
After that i took pure Nuln Oil mixed up with a few drops of pure Black to make it darker and started to paint all the lines between the Platesections.
Finally all colors including white got their final highlights and sharp edges were accentuated.
Some Metal parts were added and glazed with sever shades to get the effect of an used chrome exhaust pipe.
Weiter gehts mit dem Projekt TAU
Letzte Woche bemalte ich 6 Crisis Kampfanzüge und 6 Gheist Kampanzüge.
Fangen wir mit den Crisis Kampfanzügen an. Der Kunde hat im Vorfeld alle Punkte am Modell an dem Waffen und Upgrades befestigt werden können mit kleinen Magneten versehen und ebenso sämtliche Waffen und Optionen ebenfalls mit Magneten versehen was natürlich eine gute Methode ist für einen Spieler um von Spiel zu Spiel oder anzug zu Anzug die Bewaffnung und Optionen zu ändern. Das bedeutet natürlich das ich jede Waffe, jedes Upgrade 6 mal bemalen durfte :)
Einen großen Teil der Bemalung der Körper konnte ich mit der Airbrush machen. Nach der Grundieren in leichtem Grau kam die erste Schickt Fenrisian Grey auf das ganze Modell,gefolgt von einner Vernebelung in ca 30° von oben auf der ganzen Fihur um so den ersten Blaugrauen hellen Übergang zu schaffen. Dies setzte ich dann mit einigen Schichten Weiß fort bis ich die höchsten Stellen in reinem Weiß hatte und ein fließender Übergang von Fenrisian Grey zu weiß entstand.
Dann drehte ich die Miniatur um und sprühte von unten nochmals ganz leicht mit Fenrisian Grey komlett rundherum und erzielte somit auf allen unterseitigen Flächen eine etwas härtere Kante zu den obenliegenden Flächen was letztendlich wie ein Schatten aussieht.
Danach benuzte ich mein für diese Projekt vorbereitetes Wash in einem Mix von 2 zu 1 zwischen Nuln Oil und Lahmia Medium um es zu "verdünnen" und suchte mir ein paar Stellen auf dem Anzug und lasierte sie dann mit diesem "grauen" Gemisch und achtete darauf es etwas schmutzig aussehen zu lassen.
Danach malte ich die Schmuckfarben auf. Zuerst das Blaugrau mit highlights und danach das eyecatching Dunkelrot ebenso gehighlightet.
Anschließen wurden alle Kanten auf dem Anzug und den Waffen mit einem harten Kantenakzent versehen.
Zu letzt nahm ich Nuln Oil dem ich etwas Schwarz hinzu gegeben habe um es dunkler zu machen und malte alle Vertiefungen zwischen den Platten an.
Anschließend wurde alle Kanten in den entsprechenden Farbe hart akzentuiert und an einigen Stellen wurden noch ganz dezent Metallfarben aufgetragen und an den Waffen so getuscht das es in etwa einem Motoradauspuff gleich kommt, den die Hitze an den Krümmern diesen blauvioletten Farbton gibt.


Single Pictures
No right to be allowed by the Rules
Einzelbilder
Kein Anspruch auf regeltechnische Korrektheit


All Options in one view
Alle Optionen auf einen Blick


Those very cool Miniatures got a base color of White after a light grey Primer.
They also then were sprayed upside down from foot to head with Fenrisian Grey to add the "shadow" on the Minis.
Next step was to do some darker camouflage parts on the whole Miniature wich were made finally with 3 layers of Blue Grey Colors with the Airbrush. After that step i cleaned up the White parts of the camouflage with several layers of white till i had a smooth blending on that all to get finally a lil"washed" effect on the whole camouflage.
After that i painted the deep lines again with my Nuln Oil with Black Micture to focus the several parts of the whols suit. Here and there Edges were accentuated. Finally the Red eyecatching Color was added on some very sorted parts of the suit. The final Step was some dark metallic on the Weapon.
Diese wirklich schönen Minis bekamen einen leichten Weißanstrich mit der Airbrush, nachdem alles in Light Grey grundiert wurde. Anschließend habe ich von unten Fenrisian Grey von Fuß nach Kopf gesprüht um "Schatten" zu erzielen.
Der nächste Schritt waren die grauen Bereiche des Tarnschemas, die ich mit mehreren Grau Blau Tönen in 3 Schichten aufsprühte. Dann wurde das Weiß in 3 Schichten zu strahlendem Weiß gehighlightet mit der Airbrush.
Nach dem dies allles fertig war habe ich alle Linien mit der Nuln Oil Schwarz Mixtur gemalt um wieder etwas Ordnung in die Aufteilung der einzelnen Kampfanzugbereiche zu bringen. Dann wurde hier und da noch ein paar Kantenakzente gesetzt. Abschließend wurden einig kleine Teile der Rüstung in der roten Schmuckfarbe bemalt und etwas Metall auf die Waffe gebracht.


A handfull of single Pics
Eine handvoll Einzelbilder


Comments very apriciated
Kommentare herzlich willkommen
greets
Jaycan
sehr schönes weiß.
AntwortenLöschenmich würde trotzdem ein bild von ganz nahem intressieren ob die farbe da körnig wirkt.
weiß zu malen find ich ist ja ziemlich das schwierigste.
aber deinen bildern nach ists perfekt.
Hola
AntwortenLöschenMAGNIFICO,me encanta el ejercito,de la nieve bueno bueno.te lo as currado un monton.
UN SALUDO
Hola Amigo
Löschenis it possible to do comments in english pls for you ?
If not no worries but would be great
Un Saludo j.d \o/
hello
Löschennot English, but next time I will use google translator
I wanted to say that I love your army, and color with how hard it is achieved
A SALUTE
Hehe
LöschenThanks alot j.d
_o_ *bow*
Great army really like your paint jobs. I'm not a big fan of GW but you have a magnificent Tau Army.
AntwortenLöschenHey Timothy
LöschenThank you alot....but its a customers army and i hope he will like it :D
greets
Jay
REally nice job indeed. Using the airbrush was a good idea. I really like the effects it produces.
AntwortenLöschenCheers
Seb
Thx Sebasto
LöschenYeah i love my Airbrush...it helps alot to create the right blending and it spares time also on several things...
was a good investment ;)
greets
Jay